Looking to host a fast, secure, and scalable WordPress site on AWS? In this step-by-step tutorial, we’ll walk you through how to set up WordPress using Amazon CloudFront, an Application Load Balancer (ALB), and private subnets—perfect for both test and production environments.
Using our demo domain wp.ituptodate.com, this guide is ideal for beginners looking to build a modern WordPress setup using AWS best practices and PHP 8.1.
🌟 Why Use CloudFront, ALB, and Private Subnets for WordPress?
Here’s why this combination is powerful for WordPress hosting on AWS:
- 🔹 Amazon CloudFront: A global Content Delivery Network (CDN) that dramatically improves your website speed by caching content closer to users.
- 🔹 Application Load Balancer (ALB): Distributes incoming traffic across servers for better performance and uptime.
- 🔹 Private Subnets: Keep your WordPress server isolated from the public internet for better security. Access it only through ALB and CloudFront.
💡 Result: A secure, high-performance, production-ready WordPress website that’s optimized for both speed and scalability.
✅ Prerequisites
Before we dive in, make sure you have:
- An AWS account with IAM permissions for EC2, VPC, ALB, and CloudFront.
- A registered domain (like
wp.ituptodate.com), preferably managed via Cloudflare. - A basic understanding of VPC, subnets, EC2, and WordPress setup.
- A MySQL database (AWS RDS or local EC2).
- PHP 8.1 installed on your EC2 instance.
🔧 Step 1: Set Up Your VPC and Subnets
Start by creating a strong AWS network foundation.
🛠️ VPC Settings:
- CIDR Block:
10.0.0.0/16 - Region: Choose your nearest AWS region (e.g.,
ap-south-1for Mumbai)
🌐 Subnets:
- Public Subnet:
10.0.1.0/24(for ALB) - Private Subnet:
10.0.2.0/24(for WordPress EC2)
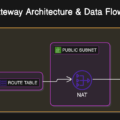
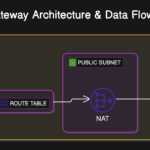
📦 Route Tables:
- Public subnet → Connect to an Internet Gateway
- Private subnet → Route via EC2 (for testing) or NAT Gateway (for production)
🔐 Security Groups:
Allow HTTP (80) and HTTPS (443).
💡 Budget Tip: Use a free-tier EC2 instance as a NAT for testing to save costs.
🖥️ Step 2: Launch EC2 and Install WordPress
🚀 Launch Your Instance:
- Place it in the private subnet.
- Use a free-tier EC2 (e.g., t2.micro) for testing.
📥 Install WordPress & PHP:
sudo apt update
sudo apt install nginx php8.1-fpm php8.1-mysql -y
sudo mkdir -p /var/www/html
cd /var/www/html
sudo wget https://wordpress.org/latest.tar.gz
sudo tar -xzf latest.tar.gz --strip-components=1
⚙️ Configure WordPress:
- Edit
wp-config.phpwith your MySQL database credentials.
▶️ Start Services:
sudo systemctl start nginx php8.1-fpm
sudo systemctl enable nginx php8.1-fpm
🌐 Step 3: Set Up Application Load Balancer (ALB)
🧭 Create ALB:
- Scheme: Internet-facing
- Subnet: Public
- Listeners: HTTP (80) → Redirect to HTTPS (443)
🎯 Target Group:
- Name:
wordpress-tg - Target: Your EC2 instance (e.g.,
10.0.60.51) - Health Check:
/or/info.php
🔐 Add SSL:
- Request an ACM certificate for
wp.ituptodate.cominap-south-1 - Attach to HTTPS:443 listener
⚡ Step 4: Boost Speed with Amazon CloudFront
🌍 Create CloudFront Distribution:
- Origin: ALB DNS (e.g.,
cloudfront-alb2-xyz.elb.amazonaws.com) - Viewer Protocol Policy: Redirect HTTP to HTTPS
- Origin Protocol Policy: Match Viewer
🔐 SSL Setup:
- Request an ACM certificate in us-east-1 for CloudFront
- Add
wp.ituptodate.comas an Alternate Domain Name (CNAME)
🌐 Step 5: Point DNS to CloudFront Using Cloudflare
🛠️ Add a CNAME Record:
- Name:
wp.ituptodate.com - Value: CloudFront domain (e.g.,
d30wa1yxgmf3fs.cloudfront.net) - Proxy: Enabled (orange cloud)
🔐 Cloudflare SSL Settings:
- Set SSL/TLS Mode to Full (strict)
🛠️ Step 6: Fix Common Issues
❌ 504 Gateway Timeout?
Check health checks. Restart Nginx and PHP:
sudo systemctl restart nginx php8.1-fpm
🔁 301 Redirect Loop?
Add to wp-config.php:
if (isset($_SERVER['HTTP_X_FORWARDED_PROTO']) && $_SERVER['HTTP_X_FORWARDED_PROTO'] === 'https') {
    $_SERVER['HTTPS'] = 'on';
}
Remove any duplicate redirect rules from Nginx or .htaccess.
🔐 SSL Not Working?
Make sure:
- Certificates are issued
- Correct regions:
us-east-1for CloudFront,ap-south-1for ALB
✅ Step 7: Complete WordPress Setup
- Visit: https://wp.ituptodate.com
- Run the WordPress installation wizard
- Set permalinks: Settings > Permalinks > Save
🌟 Best Practices for WordPress on AWS
- 🔒 Use HTTPS only – remove HTTP listener after setup.
- 🚀 Optimize caching with CloudFront cache policies.
- 💼 Upgrade from EC2 NAT to AWS NAT Gateway for production.
- 📈 Monitor logs for ALB and CloudFront regularly.
🏁 Conclusion
Congratulations! 🎉 You’ve successfully set up a modern, secure, and high-speed WordPress website on AWS using CloudFront, ALB, and private subnets. Whether you’re building a test environment or a production-ready blog or business site, this setup ensures speed, scalability, and security.
🧠 Want more tutorials like this? Keep visiting ITUptodate.com for practical cloud, DevOps, and WordPress hosting guides!


No Comments
Leave a comment Cancel